• Skip to primary navigation
  • Skip to main content
  • Skip to primary sidebar
  • Skip to footer

Elephantastic Vegan

  • About
  • Recipes
  • Vegan Lifestyle
    • Veginners
    • Vegan Travel
    • Vegan Dog
  • Cookbooks
  • Contact & PR
  • English
  • German
You are here: Home / Recipes / Breads / Basic White Bread

Basic White Bread

Published: Feb 12, 2019 Updated: Apr 12, 2019 · This post may contain affiliate links ·

57630shares
  • Facebook 267
  • Twitter
  • Email
Jump to Recipe
Basic White Bread

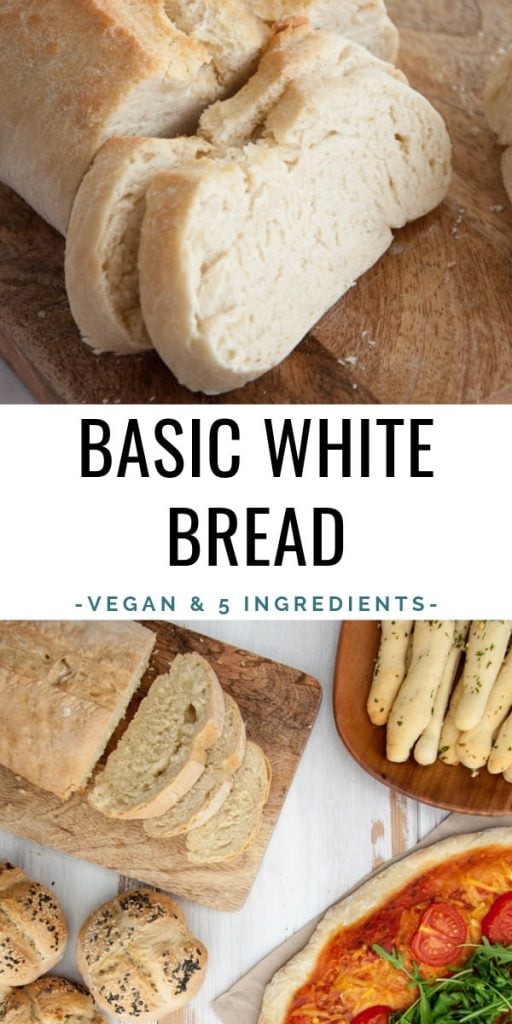
Recipe for a vegan Basic White Bread. Super soft, very versatile, delicious, quick and easy! You’ll only need 5 simple ingredients. You can use this recipe to make loaves, buns, even pizza crust, and flatbread. No need to buy bread anymore in the supermarket!

A loaf of Basic White Bread cut in slices

I have been making this Basic White Bread literally for years now. It’s the perfect base recipe for all of your bread adventures!

It’s delicious, fluffy and you can easily add special ingredients to it like olives (I love that one for grilling), cumin, sunflower seeds, dried tomatoes…

It is perfect for sandwiches, bruschetta or to make some rolls (like these Seeded Burger Buns or these Pretzel Buns).

Usually, when I make this bread, I double the recipe, make one loaf with part of the dough and some rolls to use as burger buns. You can also sprinkle some sesame seeds, flax seeds or poppy seeds on top!

How to make a Basic White Bread Loaf

The ingredients

You’ll only need 5 simple ingredients for this Basic White Bread: 

  • all-purpose flour (you could also use a mix of spelt or whole wheat flour with all-purpose flour to make it more nutritious and healthier)
  • active dry yeast
  • salt
  • olive oil
  • water

Sounds easy, right?! Well, it is!

Even if you have never baked your own bread, this is the perfect time for it! This is the perfect bread baking beginner recipe!

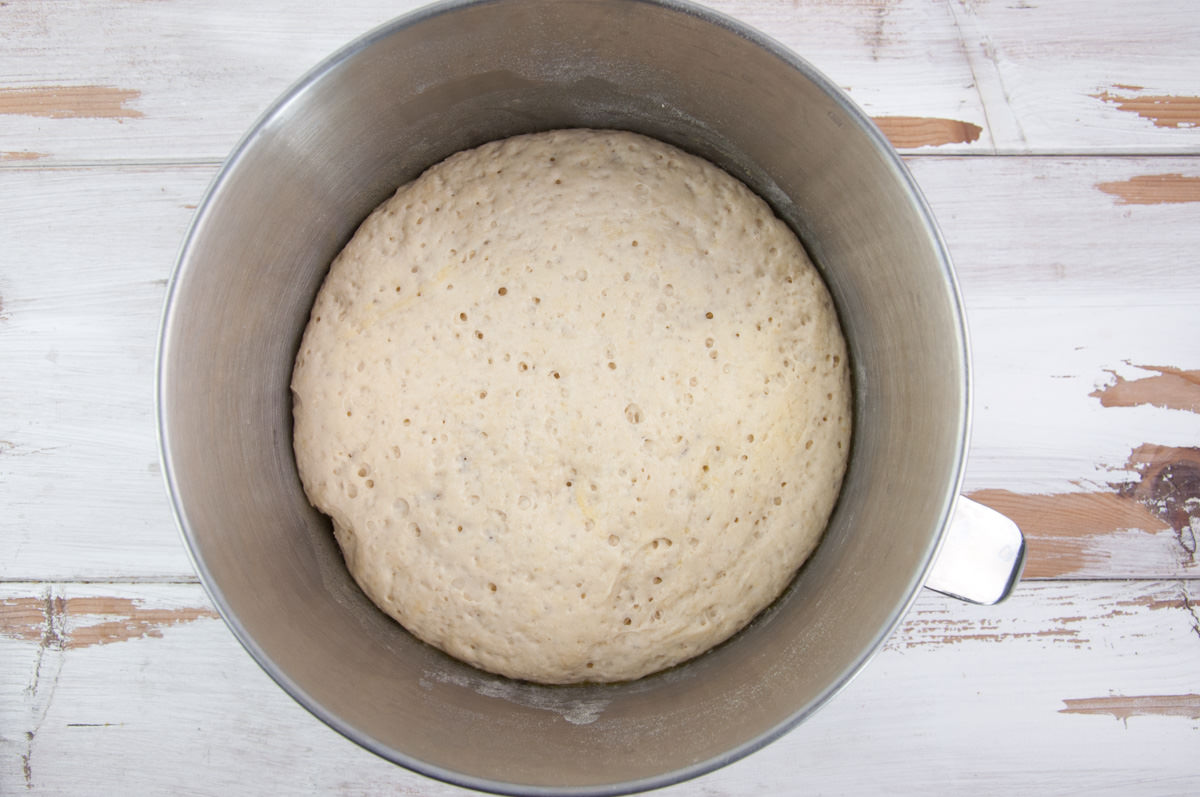
Tip: Just keep in mind that the yeast will need time to make the dough rise for about 1-2 hours depending on the room’s temperature (it needs less time in a warmer room e.g. in the summer). A good bread just needs a bit of time. But as long as you keep in mind to start early enough, you will be rewarded with delicious crispy white bread!

The basic steps

flour, yeast, and salt in a bowlStep 1: Combine flour, instant yeast, and salt.

flour, yeast, salt, oil, and water in a bowl Step 2: Add olive oil and water.

kitchen machine kneading the bread doughStep 3: Use a kitchen machine with a dough hook (or knead with your hands) to make the bread dough.

bread dough in a bowl to rise Step 4: Cover the bowl with a clean kitchen towel. Let the dough rise in warm spot for 1-2 hours.

bread dough after rising Step 5: After 1-2 hours, the dough should have approximately doubled in size.

bread loaf before baking Step 6: Form a bread loaf and carve the surface with a knife.

A loaf of Basic White BreadStep 7: Bake the bread in the oven until golden brown. 

Serve the Basic White Bread with…

  • spreads (basic hummus, spinach hummus, potato cheese spread)
  • creamy soups (carrot ginger soup, broccoli soup)
  • stews (goulash, chili con carne)
  • tomato bruschetta

How to store bread…

Homemade bread is the best on the day it is baked. Store leftovers at room temperature – a breadbox would be best, or a paper bag or in a container with a not completely closed lid to allow airflow. I like to toast bread slices when I use bread that I have baked the day(s) before.

A loaf of Basic White Bread

Versatile Multi-Purpose Bread Dough

Pizza, Naan, Rolls, Bread Loaf and Garlic Herb Breadsticks made with the Multi-Purpose Bread

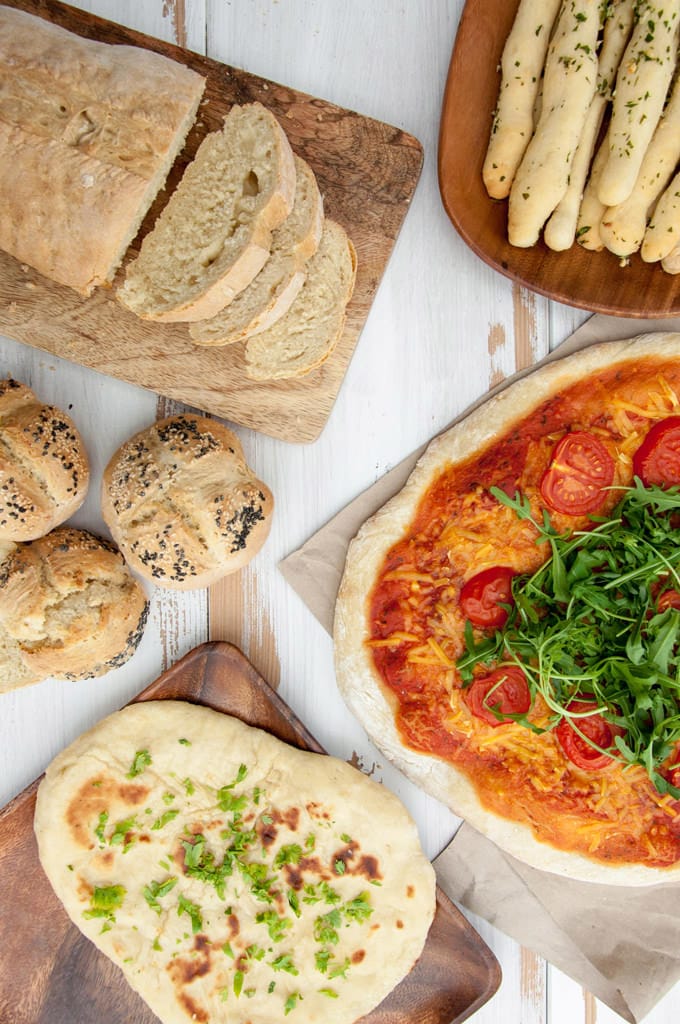
What if I told you.. you could make all of this with the basic white bread recipe?! Well.. you can! This bread dough is the perfect base recipe for bread loaves, burger buns, breadsticks, even fluffy naan, and pizza crust! The possibilities are endless!

Bread FAQ

Vegan Bread? Isn’t all bread vegan?

Unfortunately not! Some breads contain milk or honey, sometimes the surface is brushed with egg whites. It’s always good to check the labels for non-vegan ingredients.

Is yeast vegan?

Yeast is classified as a fungus (just like mushrooms) and therefore vegan-friendly. So no worries, you can eat yeast as a vegan! 

I hope you enjoy this simple recipe as much as I do! I’d love to hear what you’re making with the basic white bread recipe!

Cheers, Bianca

Basic White Bread - vegan| ElephantasticVegan.com

Basic White Bread

Elephantastic Vegan
You can use this basic white bread recipe for all kinds of breads: bread loaves, burger buns, flatbread, pizza crust, bagels, pretzels,... Anything is possible!
4.34 from 39 votes
Print Recipe Pin Recipe
Prep Time 20 mins
Cook Time 25 mins
Resting Time 2 hrs
Total Time 45 mins
Course Basics, Bread
Cuisine Vegan
Servings 1 loaf
Calories 984 kcal

Ingredients


  • 2 cups all-purpose flour
  • 1 teaspoon instant yeast
  • 1/3 teaspoon salt
  • 1 teaspoon olive oil
  • 2/3 cup lukewarm water

Instructions
 

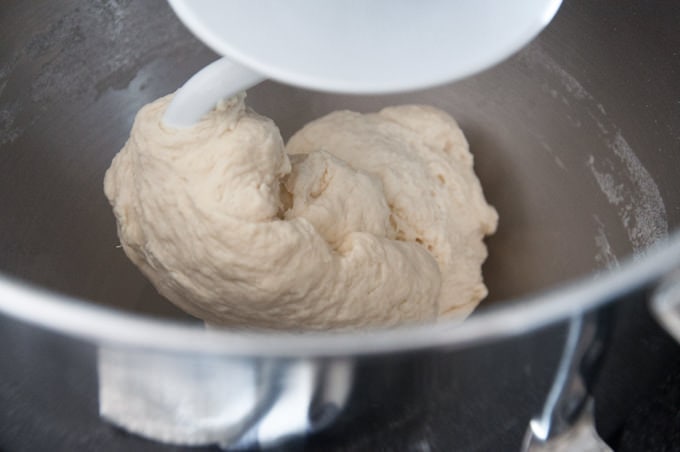
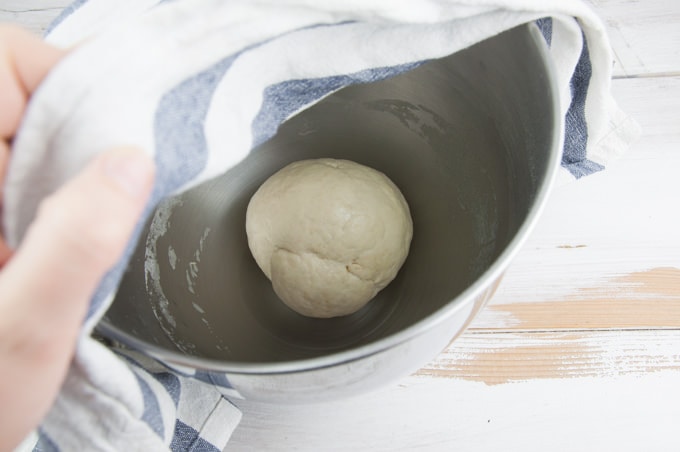
  • In a large mixing bowl, combine the flour, instant yeast, and salt. Then add the olive oil and water and stir to combine, then knead with your hands (or use a kitchen machine with a dough hook) until it comes together in a smooth dough*.
  • Let it sit, covered with a clean kitchen towel, in a warm spot until it doubles in size (about 1 1/2-2 hours).
  • Preheat the oven to 200 °C or 400 °F.
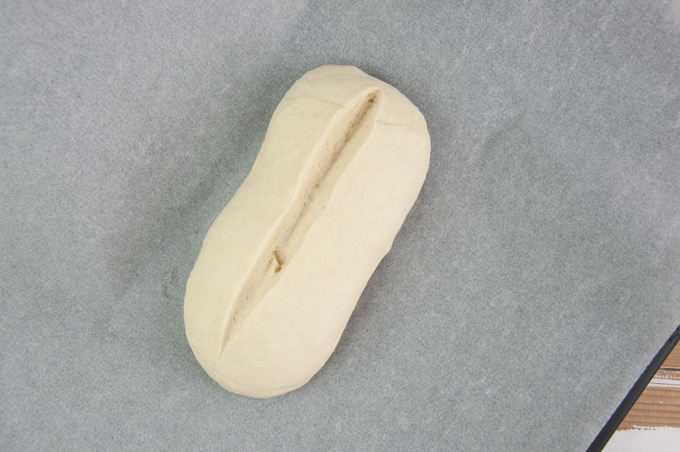
  • Form a bread loaf and carve the surface of the dough lightly with a knife (I've made one long cut across the bread).
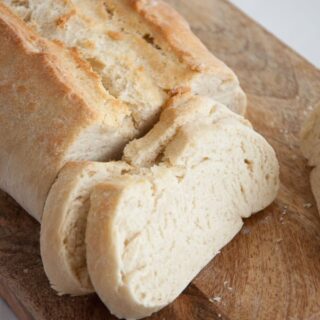
  • Then bake the bread in the oven until the surface is golden**. You can knock on the bottom of the bread and when it sounds hollow it's done!

Notes

*Adjusting the dough: If the dough is too crumbly, add a bit more water. If the dough is too sticky, add a bit more flour. 
**Baking times: How long the bread needs to be in the oven depends on the form you're making. Loaves need about 20-30 minutes, rolls 15-20 minutes.

Nutrition

Serving: 1loafCalories: 984kcalCarbohydrates: 195gProtein: 30gFat: 7gSaturated Fat: 1gSodium: 794mgPotassium: 382mgFiber: 9gCalcium: 38mgIron: 11.9mg
Tried this recipe?Mention @elephantasticvegan or tag #elephantasticvegan!

More delicious Vegan Bread Recipes

Vegan Bread Recipes

15+ Vegan Bread Recipes

This post was first published in July 2014. Updated in February 2019.

57630shares
  • Facebook 267
  • Twitter
  • Email

About the author

biancaHi, I’m Bianca! When I went vegan in 2012, I fell in love with food all over again.

You can find me on Facebook, Twitter, Instagram, Pinterest, and YouTube.

Check out my first cookbook: The Veginner’s Cookbook!

Previous Post: « Chocolate Granola
Next Post: Sugar-Free Banana Cookies »

Reader Interactions

Comments

  1. Haile Thomas

    February 25, 2015 at 5:20 pm

    Your bread looks so yummy. I can just smell it looking at your pictures. LOL I am definitely going to try my hand at making bread. Thank you so much for the inspiration!

    Reply
    • bianca

      February 25, 2015 at 5:35 pm

      Thank you so much, Haile, for your lovely comment! I hope you enjoy the bread :) they are so many possibilities, you can make a different bread every time so it never gets boring.

      Reply
      • Haile Thomas

        February 25, 2015 at 5:56 pm

        Yes, for sure. I’ll be sure to make a video and let you know when it’s up on my Youtube Channel! Thanks again. I’m off to check out your other recipes!!

        Reply
      • Lauren

        February 6, 2017 at 6:24 pm

        Hi I was just wondering what do you put the dough in or on to bake in the oven? Thanks!

        Reply
        • Bianca

          February 8, 2017 at 4:10 pm

          Heya Lauren, I put the dough on a baking tray lined with parchment paper, because the dough should be firm enough to hold its shape. But you can put it in a loaf pan if you want that distinct shape :)

          Reply
  2. Justine

    April 20, 2016 at 7:11 pm

    This looks amazing and I can’t wait to make it! Do you have a suggestion for an olive oil substitute to make it oil-free?

    Reply
    • Bianca

      April 20, 2016 at 8:19 pm

      Thank you, Justine. You can simply omit the olive oil to make it oil-free. I forgot to add it in one time and it turned out great too :)

      Reply
  3. Sholeh Bousheri

    May 16, 2016 at 7:50 pm

    Awesome, thank you.

    Reply
    • Bianca

      May 17, 2016 at 5:39 pm

      My pleasure! Hope you like it :)

      Reply
  4. Grace

    July 9, 2016 at 10:21 pm

    going to make this right now!!!:)

    Reply
    • Bianca

      July 10, 2016 at 10:30 am

      Awesome! I hope you like it! :)

      Reply
  5. Marissa

    August 1, 2016 at 9:54 pm

    To bake you didn’t specify if you put it in a loaf pan or what? Would love to make it, just confused on that part. Thanks!

    Reply
    • Bianca

      August 1, 2016 at 10:51 pm

      I didn’t put it in a loaf pan (although you could of course use one). The dough is holding together enough, so you can form a round loaf, a long loaf, smaller rolls etc. I simply put the dough on a floured parchment paper on a baking tray, carve it with a knife and bake it like that. :) Hope you’ll like it!

      Reply
      • Marissa

        August 6, 2016 at 10:52 pm

        Awesome, going to make it now. Thanks for the response! :)

        Reply
  6. Jillian

    September 8, 2016 at 1:17 pm

    Do you have a gluten-free option?

    Reply
    • Bianca

      September 8, 2016 at 8:38 pm

      Unfortunately not because I’m the worst at gluten-free baking :D But if you have a go-to gluten-free bread mix, you could try using that (and probably it’s better to put the dough in a bread baking form). Let me know if you give it a try :)

      Reply
      • Jillian

        September 9, 2016 at 12:05 am

        I sure will! I’m not so great at it either but I’ll let you know if I work up tha courage to give it a try :)

        Reply
  7. Becki

    September 12, 2016 at 9:08 pm

    Can you make this with no bread machine? How long would I hand knead the dough for? Thanks!

    Reply
    • Bianca

      September 13, 2016 at 10:18 am

      Hey Becki, sure, you can knead the dough by hand. It will take about 5 minutes. Start by combining it with a spoon, then knead it with your hands until it’s a nice, non-sticky dough. You may have to add a bit more flour (if it’s too sticky) or more water (if it doesn’t hold together). Happy baking!

      Reply
  8. Audrey

    September 20, 2016 at 1:03 am

    I just tried this. I’ve never made white bread before but I would say it only makes one loaf. I split it and the loafs are much smaller than I expected. It tastes really good though!

    Reply
    • Bianca

      September 22, 2016 at 3:17 pm

      Thank you for the feedback, Audrey! I’m glad you liked it :)

      Reply
  9. Zona Alexander

    September 30, 2016 at 12:49 am

    Do I turn oven to 480 degrees F? Sounds a little too hot

    Reply
    • Bianca

      October 1, 2016 at 6:54 pm

      I always bake the bread at full heat, so 250°C and that converts to 480°F ..I keep a close eye on it and once it gets golden/brownish on the crust, it take it out and it’s ready. But there’s nothing wrong with baking it at a lower heat. Especially when making large loaves, reducing the heat and leaving it in longer, makes sure it bakes all the way through. All ovens are different :) Hope you enjoy it, Zona! :)

      Reply
    • Donna

      January 14, 2019 at 1:14 am

      It was to hot. Mine burned.

      Reply
  10. Leah

    October 1, 2016 at 6:59 am

    I tried this recipe at a lower temperature. 480 degrees Fahrenheit seemed way too hot. The other bread I make regularly bakes at 425, but only for about 15 min. Then you lower the temp to 375 for another 15 min. I can’t quite remember what I set my oven to for this recipe, though. 400 maybe? Otherwise, I like this bread SOOOOO much better than my other bread. Thank you so much for sharing!

    Reply
    • Bianca

      October 1, 2016 at 6:53 pm

      Thank you for the feedback, Leah! I always bake the bread at full heat, so 250°C and that converts to 480°F..I keep a close eye on it and once it gets golden/brownish on the crust, it take it out and it’s ready. But there’s nothing wrong with baking it at a lower heat. Especially when making large loaves, reducing the heat and leaving it in longer, makes sure it bakes all the way through. All ovens are different :) I’m glad you liked itttt, lots of love! :)

      Reply
  11. Angel

    December 13, 2016 at 5:06 pm

    Made this for Thanksgiving. Added fresh thyme and rosemary to one and garlic bread seasoning to another. The bread is best warm. It gets quite hard and breaks up as the day passes. Nonetheless, it’s a good recipe.

    Reply
    • Bianca

      December 16, 2016 at 4:16 pm

      These are great variations! I try to keep the bread in a covered bread box to prevent it from drying out over the day. When I’m not using up the bread on the same day, I toast the slices. So they’ll get soft and warm again :)

      Reply
  12. Jaimie

    January 3, 2017 at 1:57 am

    I have made this 2x’s in less than a week! Delicious and easy….and fun to play with different flavors/add-ins.
    One question, though, my bread barely rises. I follow the directions to a T and let sit for the whole 90min, but it doesn’t really expand. Any suggestions?
    It still comes out amazing! Dense and delicious (not too sure if the density is because it doesn’t really rise???).

    Thank you so much!!!

    Reply
    • Bianca

      January 3, 2017 at 10:42 am

      Hi Jaimie, I’m so glad you like the recipe! Yes, the denseness is because your dough didn’t rise. Let’s change that :)
      Reasons why the dough may not rise:
      * the yeast is old/inactive (if you’re not sure about your yeast, you can put the yeast in a small bowl, add a bit of lukewarm (not too hot!) water of the recipe and let it sit for about 10 minutes. when it’s bubbly = it’s working. Not bubbly = water is too hot or too cold or the yeast is old or inactive. Once you know your yeast is working, you can add it to the flour, salt, add the rest of the water and oil and knead.
      * the room temperature is too cold. The dough needs a little bit of warmth to rise (in winter, I put the bowl on the heating; in summer it’s usually not a problem because it’s warm enough in the room).
      * using gluten-free flour (gluten-free flours are so different, they don’t really rise)
      * are you using the right kind of yeast (it’s dried baker’s yeast – I always use active dry yeast, but instant yeast or rapid-rise yeast should work just as fine? not to confuse with nutritional yeast << that wouldn’t work.

      I hope that solves the problem. Let me know how it goes! Together we can fix it! :)
      Best,
      Bianca

      Reply
  13. Kirsty

    January 16, 2017 at 1:44 am

    Can I just say thank you for putting this in metric as well? When I’ve found US recipes on the internet I always have to skip over them, because it’s a lot of pre-thinking to convert from volume to weight! Gonna be trying this tomorrow morning!

    Reply
    • Bianca

      January 16, 2017 at 3:22 pm

      You’re welcome! Before I had my measuring cups and spoons, it was so hard for me to cook vegan recipes from the internet when the authors didn’t provide metric measurements. Now, I’m trying to provide both measurements (I sometimes forget though haha but I try!). Good luck, let me know how it goes ^.^

      Reply
  14. Calista

    February 7, 2017 at 12:47 pm

    Can you substitute in whole wheat flour instead of white flour? Does it work the same?

    Reply
    • Bianca

      February 8, 2017 at 4:13 pm

      You can definitely substitute the white flour for whole wheat flour, but you might have to adjust the flour-water-ratio a bit. Add more water if it’s too crumbly. You could also use a mix of whole wheat and white flour :)

      Reply
      • Calista Brewer

        February 8, 2017 at 11:21 pm

        That sounds great.Tthanks for the detailed response :)

        Reply
  15. Marissa Bower

    August 29, 2017 at 5:34 am

    Wow! First time making this bread! Loved it!! Thanks so much.

    Reply
    • Bianca

      August 29, 2017 at 4:52 pm

      I’m so glad you liked it, Marissa! :)

      Reply
  16. claudia

    November 1, 2017 at 9:49 pm

    Hi, this looks really good. Can I just make it entirely in my bread machine?

    Reply
    • Bianca

      November 2, 2017 at 7:23 pm

      Totally, I’ve done this many times! Use the *white bread* setting. :)

      Reply
  17. Tjasa

    December 20, 2017 at 4:22 pm

    This bread looks amazing! I’m making it this weekend for sure!! yum!

    Reply
    • Bianca

      December 23, 2017 at 4:29 pm

      Yeay! I would love to know know how it turns out :)

      Reply
  18. Micheala

    January 25, 2018 at 5:25 pm

    This was my first time ever trying to make homemade bread, and it was good! A little too dense for my liking but I think the water was just not warm enough for my yeast. So, I’ll try again tomorrow after my 4 year old devours this loaf with peanut butter on it (currently his favorite food) and see if I can fix that. Great recipe!

    Reply
    • Bianca

      January 25, 2018 at 8:27 pm

      Hi Michaela, the water should be lukewarm (if it’s too hot it can kill the yeast, then it results in a dense bread as well), so it’s better to keep it a bit cooler than too warm. And it’s best to keep the bowl with the dough in a warm place (maybe near a radiator) while it’s rising. Then it should work just fine! :) Hope it turns out a bit fluffier next time! :) Thank you for the review!

      Reply
      • Micheala

        January 30, 2018 at 4:25 pm

        I figured it out! I forgot to mention I only use whole wheat flour so it was bound to be more dense and it took some tweaking, but now I make this every other day so we ALWAYS have a loaf on hand! If anyone uses whole wheat flour I recommend using about 1/4 to 1/2 cup more water and in my experiments, a pinch of sugar really helps too. Thanks again!

        Reply
        • Bianca

          February 2, 2018 at 9:58 am

          Ah yes! That explains it! :)
          It’s fun to see how the use of different flours will change the result, right?
          Thank you for the instructions when using whole wheat flour, readers will appreciate that! :)

          Reply
  19. Barbara

    January 29, 2018 at 3:03 pm

    Never before made bread until now! Thank you for an easy recipe that didn’t scare me!! I used 1/2 AP and 1/2 spelt flour and it came out wonderful! Dense and chewy and hearty and yummy!! THANKS!

    Reply
    • Bianca

      January 29, 2018 at 8:49 pm

      So glad to hear that, Barbara! Thank you so much for the great review!

      Reply
  20. Tjasa

    March 26, 2018 at 8:07 pm

    This recipe sounds amazing! Can I make it with corn flour?

    Reply
    • Bianca

      March 27, 2018 at 3:17 pm

      Ohh, corn bread! That sounds interesting! Actually, I’ve never tried this Basic White Bread with corn flour. Not sure if corn flour works with yeast.. I don’t think it would rise. Also, it’s probably best to bake corn bread in a loaf pan, not sure if it would hold together in a loaf on its own because of the missing gluten. I think it would be best to stick to corn bread recipes..

      Reply
  21. kath

    May 2, 2018 at 12:32 pm

    if I was to make this with sundried tomatoes, would you suggest leaving out the olive oil as they come in oil already? thanks!

    Reply
    • Bianca

      May 3, 2018 at 8:38 pm

      yeah, leaving out the olive oil would be a good idea! :)

      Reply
  22. Heather

    July 26, 2018 at 9:59 pm

    I just made this and the outside is really hard and undone a little on the inside I only put it in for 20 minutes what did I do wrong ? 😟

    Reply
    • Bianca

      July 29, 2018 at 6:28 pm

      What you can do the next time:
      – Maybe reduce the heat a bit – maybe your oven is much more powerful :) That way it won’t brown that fast and it has more time to bake all the way through.
      – Maybe your loaf was too huge. If you make it longer, it will bake all the way through faster.
      – If the top browns too quickly, you can place the bread on a lower rack to make sure it bakes without burning the top.

      I hope the tips help! Let me know how it will turn out :)

      Reply
  23. Erika

    September 8, 2018 at 12:13 am

    I’ve made this bread twice now! However…the first time I was in Norway and the oven was confusing and I basically started the parchment paper on fire,,, but the bread was still tasty! Second time, its currently in the oven, I just had to remove both loafs off of the parchment paper because it was starting to burn… is there special parchment paper you use?? I am having a hard time with the high heat. Great recipe!!!!!

    Reply
    • Bianca

      September 18, 2018 at 2:49 pm

      What?! That’s weird! I’ve never had parchment paper catch fire and bake with high temperatures all the time.
      Does your parchment paper come very close to the walls or the heating elements?
      Or check if the package says if the parchment paper is suitable for up to a specific temperature…

      Reply
  24. Miranda

    October 15, 2018 at 8:00 pm

    I am currently baking this – with gluten free flour. So far I’ve noticed I needed a bit extra water to combine my flour, it didn’t rise enough for 2 loafs so I am just baking one. I put mine in a bread pan even though it is holding enough to put on a baking sheet but I ran out of parchment paper so this will do! I put my oven to 400 instead of 480, it’s going in the oven now. Fingers crossed!

    Reply
    • Bianca

      October 17, 2018 at 1:05 pm

      I’m not sure if the recipe works with gf flour, the flours are completely different. I haven’t had much luck with gf baking, so I kind of gave up :D How did it turn out?

      Reply
      • Miranda

        October 20, 2018 at 6:11 am

        TERRIBLE lol. I’m not having much luck either. This was one of the first bread recipes I tried. I’ve tried 3 more since this and nothing. My daughter just got diagnosed with a bunch of food allergies and I am seriously struggling. No peanuts or tree nuts, no eggs, no soy, no dairy, no gluten. Losing hope.

        Reply
  25. Moya

    October 16, 2018 at 11:27 pm

    Hi there, I made your bread but should I have proved it again once I had shaped it? Any other breads I’ve made a normal to this. Wanted to try the vegan one as my daughter is vegan

    Reply
  26. Elle

    December 3, 2018 at 10:30 pm

    I just recently moved to Sweden and since everything here is SOOOOOOOO expensive I decide to have a lots of home made/baked from scratch meals. I made this and it 22h15 and I’m waiting for it to come out of the oven. Thank you so much for sharing the receipe and the hummus one. Hope that turns out great!

    Reply
  27. Heather

    January 15, 2019 at 9:25 pm

    Going to make this now for my son is allergic to dairy, egg, peanut and almond. Has anyone had any luck freezing the 2nd loaf?

    Thank you so much for sharing this recipe! Finding food for my son has proved to be quite challenging!

    Reply
    • Bianca

      January 19, 2019 at 4:28 pm

      I’d recommend slicing the second bread and freezing the bread slices, that way you can toast it up when you need them.

      Reply
  28. Holly

    January 18, 2019 at 8:47 am

    This was my first time making bread and it turned out great. I baked it at 425°f for 30 minutes. The outside was almost perfectly crispy (but a little on the hard side) and the inside was soft. I’ll definitely use this recipe again but will lower the temp a little more next time.

    Reply
    • Bianca

      January 19, 2019 at 4:35 pm

      Awesome! Thank you so much for your feedback!

      Reply
  29. Evie

    February 9, 2019 at 10:13 am

    This recipe looks awesome gonna try it out with my mum later!
    Question am I allowed to use plain flour instead of all purpose flour?
    Thanks
    Evie

    Reply
    • Bianca

      February 11, 2019 at 9:10 am

      Hi Evie, sure that works just fine!

      Reply
  30. paisley

    June 11, 2019 at 7:28 pm

    i decided to go vegan a couple days ago but this is one of the first things i am making, its actually rising right now!

    Reply
  31. Sophia

    August 17, 2019 at 12:57 am

    How should we adjust the baking times for pizza? Should we cook the crust first, and then add toppings?

    Reply
  32. Gina T

    November 17, 2019 at 5:04 pm

    I noticed the bread had only one rise, most bread, rolls, ect. need to rise after it’s kneaded and then after the first rise, it’s formed into the shapes, rises again, a shorter rise, and then baked. Is this not the case with this recipe or was it omitted?

    Reply
  33. Wyatt

    December 12, 2019 at 5:43 am

    This is great! Thanks!

    Reply
  34. Ashley

    March 13, 2020 at 7:38 pm

    Help! What am I doing wrong? I tried to to make this twice and both times they were soupy. The first time I did it I thought my yeast was bad so I started over with brand new yeast and it was still soupy. The second time it still looked like soup and I added an additional 3 cups to get it to try to form a dough and it’s STILL sticky! I haven’t baked it yet, but I liked this recipe as it was minimal ingredients and minimal wait time. Has this ever happened to you? I’m using all the same ingredients listed…

    Reply
    • Bianca

      March 17, 2020 at 12:28 am

      this is weird. I’ve been making this dough 30+ times and never had this problem. are you sure you’re using only 2/3 cup of water (=150ml)?

      Reply
  35. Smudge

    April 10, 2020 at 8:24 am

    Just tried this for lunch … was awesome. A bit dense, but we used it for dipping in soup, and it tasted amazing! Think I might have needed to knead it a bit more .. will definitely use this recipe again.

    Reply
  36. Mrs. G

    July 26, 2020 at 6:49 pm

    aloha,

    Due to allergies, what can the olive oil be substituted for?

    Reply
    • Bianca

      July 27, 2020 at 11:17 pm

      Hi, that depends on the allergies. But you can use ANY oil (canola, sunflower, peanut etc.) or leave out the oil completely.

      Reply
  37. Mrs. G

    August 2, 2020 at 3:53 am

    Hi, can we sub for brown rice flour for gf?

    Reply
    • Bianca

      August 2, 2020 at 1:50 pm

      no, this won’t work. please look specifically for a gf bread recipe because the flours are so different.

      Reply
  38. Rachel

    October 17, 2020 at 6:39 pm

    Hi! Awesome recipe! It worked perfectly. I was wondering if I could add some dried tomatoes and olives in the dough? I thought about adding after the dough doubles its size, then knead a little bit and bake it, but I am not sure if this second kneading will afect the texture and so on.

    Reply
    • Bianca

      November 24, 2020 at 2:33 pm

      Absolutely! I usually add olives and dried tomatoes at the end of the kneading, so before the dough doubles in size. And it works out well.

      Reply

Leave a Reply Cancel reply

Your email address will not be published. Required fields are marked *

Recipe Rating


Primary Sidebar

  • Facebook
  • Instagram
  • Pinterest
  • Twitter
  • YouTube

Portrait of Bianca HaunHi! I’m Bianca. On my blog, you’ll find easy & delicious vegan recipes. I love homemade bread, pancakes, avocado, and anything in between!

Popular Posts

Vegan & Gluten-Free Green Falafel | ElephantasticVegan.com
Vegan Banana Bread Pancakes with Chocolate Chunks | ElephantasticVegan.com
Vegan Falafel Curry
Amazing Vegan Curry Recipes
20+ Vegan & Refined Sugar-Free Desserts
Vegan Breakfast Recipes

Trending Posts

Vegan Blueberry Ice Cream in a cone
Sugar-Free Banana Cookies
Baked Potato Slices
Banana Blossom Vegan Fish
Fluffy Vegan Banana Pancakes
Homemade Vegan Sausages

Footer

Logos Features
Blogheim.at Logo

Footer

About

  • About the author
  • Privacy Policy

Contact

  • Contact

Copyright © 2014-2020 by Elephantastic Vegan

57630shares